I've recently set up a 40X aquarium (40 gallons, 36-1/2" x 15-1/2" x
17"). I needed a stand to put it on, but was not very satisfied with
the stands that I've seen in any local aquarium stores. Searching
the 'net led me to http://www.thekrib.com,
which has some very useful FAQs about aquariums, and some possible plans
for tank stands. Based on these, and other plans I found on the net,
I came up with the following design.
 The
tank sits on a square frame made from kiln-dried 2x4's. I chose the
more expensive kiln-dried wood mostly because I was concerned about shrinkage
of the frame pieces over time, but I suspect that kiln-dried wood will
warp less as well.
The
tank sits on a square frame made from kiln-dried 2x4's. I chose the
more expensive kiln-dried wood mostly because I was concerned about shrinkage
of the frame pieces over time, but I suspect that kiln-dried wood will
warp less as well.
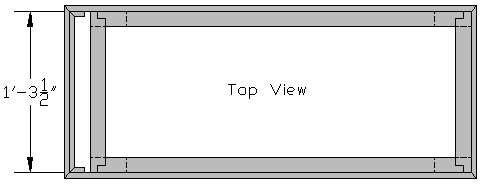
The frame looks something like the picture to the right. The edge on
the bottom of the tank just barely fits inside the 15-1/2" x 36-1/2" frame.
This measurement is very critical, because I wanted to have a lip higher
than the tank bottom made up by the plywood pieces I used to make the frame
pretty on the outside. With a glass tank, I didn't need a solid top
for the stand, so I didn't make one. Another important feature of
a glass tank is that all of the weight (I figured 400 lbs for a 40 gallon
tank) is borne by the supports under the very edge of the tank. If
my tank were acrylic, I would probably use 3/4" plywood to make a top for
the stand.
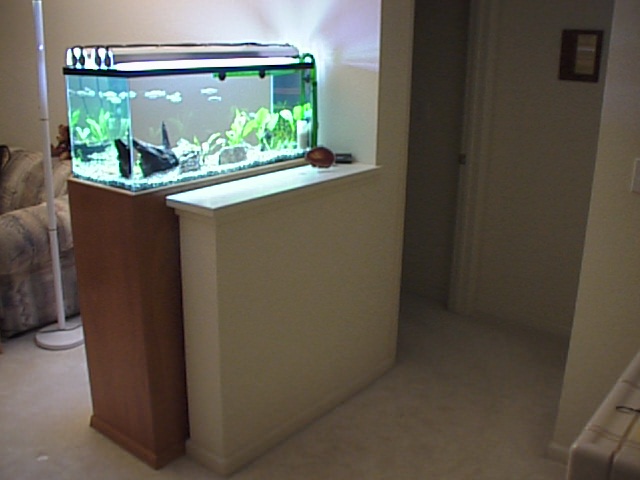
I needed the bottom of the tank to be just over 40" from the floor,
because my tank location is in front of a 40" tall half-wall in my living
room. With the tank at this level, you can see into the tank from
both sides, and it serves a dual-purpose as a room divider.
As you can see, I used only 4 2x4 legs to support the tank; if
my tank was much bigger (especially if it was any longer), I would probably
put 2 additional legs on the long sides. The braces on the left and
right of the stand are probably not needed, but I put them in to allow
me to put 2 15" pre-fab shelves inside the cabinet for the canister filter
and other hardware and supplies.
 Due
to the location of the stand, I didn't want to have unsightly plumbing
across the back of the tank, so I use a canister filter below the tank
in the cabinet, and I ran the intake and output hoses along the short side
of the aquarium. With this approach, I saw that I would need to have
some pathway to run hoses along the side of the tank down into the cabinet.
I adjusted my plan for the exterior of the stand to allow a 2" gap between
the 2x4 frame and the 1/2" mahogany plywood I selected for the exterior.
I had the plywood cut with 45° miters as shown in the picture to the
left. I installed 1/2" oak quarter round moulding along the top edge
of the exterior for a smooth top edge. I used the same quarter-round
moulding along the left edge of the top to support an additional piece
of plywood to cover the 2" gap between the left side of the tank and the
left edge of the plywood.
Due
to the location of the stand, I didn't want to have unsightly plumbing
across the back of the tank, so I use a canister filter below the tank
in the cabinet, and I ran the intake and output hoses along the short side
of the aquarium. With this approach, I saw that I would need to have
some pathway to run hoses along the side of the tank down into the cabinet.
I adjusted my plan for the exterior of the stand to allow a 2" gap between
the 2x4 frame and the 1/2" mahogany plywood I selected for the exterior.
I had the plywood cut with 45° miters as shown in the picture to the
left. I installed 1/2" oak quarter round moulding along the top edge
of the exterior for a smooth top edge. I used the same quarter-round
moulding along the left edge of the top to support an additional piece
of plywood to cover the 2" gap between the left side of the tank and the
left edge of the plywood.
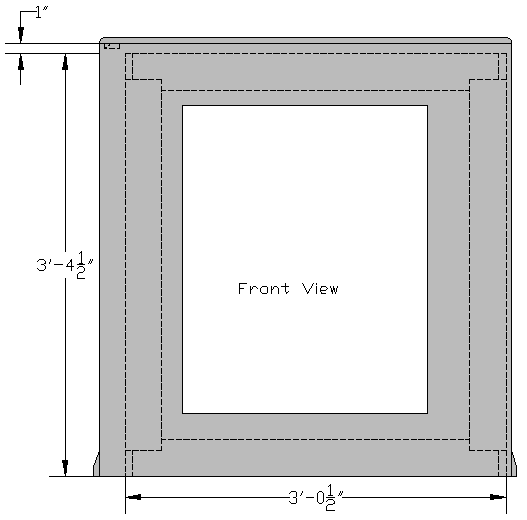 The
front of the tank stand has a door hole cut 8" from each side, and 6" from
the top and bottom. I used an identical piece of plywood (without
the door hole) for the back of the stand. The dashed lines in the
picture show the location of the frame pieces relative to the door.
I used biscuits and glue to attach each plywood piece both to the adjacent
plywood pieces and to the top and bottom rails of the frame. If you
don't have a biscuit joiner, you could probably get away with just gluing
the pieces to the frame, but you would have to use nails or screws to hold
everything tight until the glue dried. On the other hand, making
the biscuit cuts took very little time, and you can probably borrow or
rent a biscuit joiner, giving a much more sturdy frame. Note that
the alignment of the biscuit slots on the top rail was tricky, since the
plywood and rail don't have a common point to measure from.
The
front of the tank stand has a door hole cut 8" from each side, and 6" from
the top and bottom. I used an identical piece of plywood (without
the door hole) for the back of the stand. The dashed lines in the
picture show the location of the frame pieces relative to the door.
I used biscuits and glue to attach each plywood piece both to the adjacent
plywood pieces and to the top and bottom rails of the frame. If you
don't have a biscuit joiner, you could probably get away with just gluing
the pieces to the frame, but you would have to use nails or screws to hold
everything tight until the glue dried. On the other hand, making
the biscuit cuts took very little time, and you can probably borrow or
rent a biscuit joiner, giving a much more sturdy frame. Note that
the alignment of the biscuit slots on the top rail was tricky, since the
plywood and rail don't have a common point to measure from.
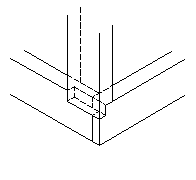 The
diagram to the left is a detail of how the corners of the frame fit together.
I used my router to make 3/4" deep cuts to allow the frame members to overlap
enough for screws and biscuits to secure the frame together. Below
are pictures of the cuts needed in the top and bottom frame members to
allow the legs to fit in place. For the top and bottom square frame,
the cuts were 3/4" long, the cuts for the legs were 1" long to get a bit
more overlap.
The
diagram to the left is a detail of how the corners of the frame fit together.
I used my router to make 3/4" deep cuts to allow the frame members to overlap
enough for screws and biscuits to secure the frame together. Below
are pictures of the cuts needed in the top and bottom frame members to
allow the legs to fit in place. For the top and bottom square frame,
the cuts were 3/4" long, the cuts for the legs were 1" long to get a bit
more overlap.
This is the top: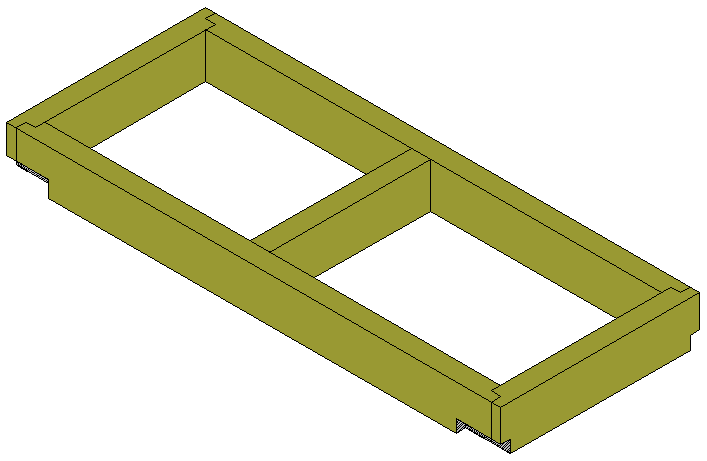
And this is the bottom: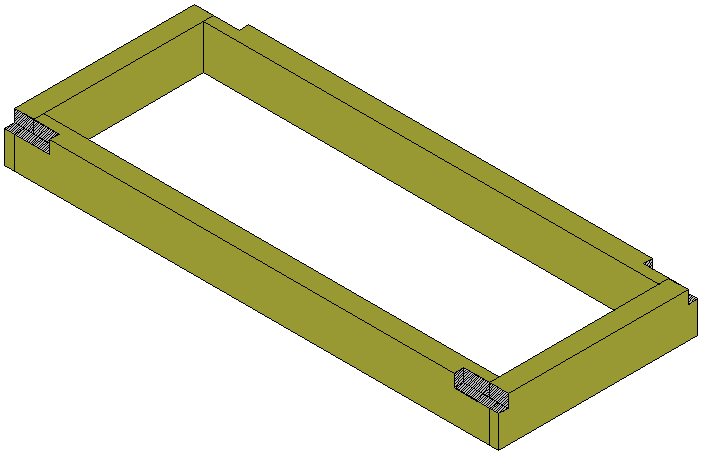
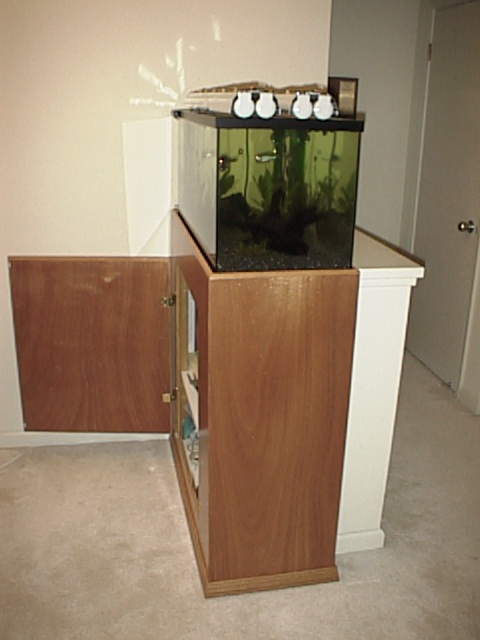
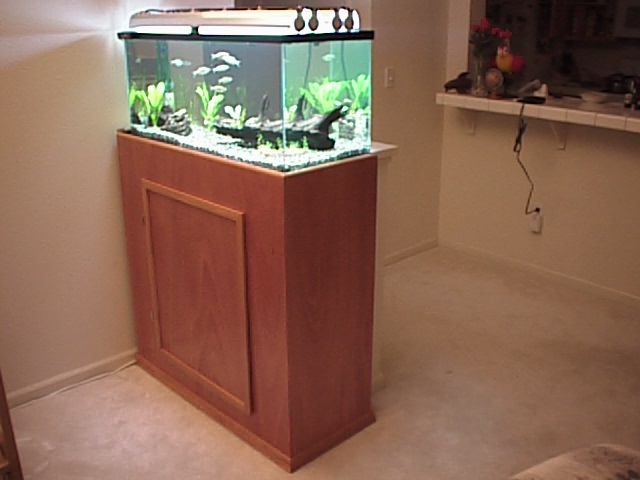
Once I had everything together, I put some fancy oak floor moulding
around the base of the stand, and used the piece cut out for the door along
with some oak flat moulding to make a serviceable door. I finished
the stand with 3 coats of clear spar varnish. After varnishing, I
left it to dry for about 1 week before I moved it into the house and set
the tank on top of it.
Here's a few other shots of the finished stand. I'm currently
on a hood to match the stand base. Click on the thumbnails to see
the full-size view.